移動 (Move)
移動遊戲物件大致上分成兩種方法:物理 (physics) 與 非物理 (non-physics) 移動。在新增敵人一節中,我們使用 setLinearVelocity 方法來移動敵人物件,這就是物理的方式。
物理移動 (Physical move)
線性移動 (Linear Move)
物理的移動是依賴 Corona 物理引擎達成的,物理移動具有 Physics body 的物件有效。其中最基礎的移動方式是使用 setLinearVelocity() 設定物體線性速度,讓物體直線移動。setLinearVelocity 有兩個參數,分別是 xVelocity 與 yVelocity,分別代表水平與垂直方向的速度。
Syntax
object:setLinearVelocity( xVelocity, yVelocity )
xVelocity, yVelocity (required)
Numbers. 速率值,單位為像素 / 秒。
xVelocity 為水平方向速度,yVelocity 則為垂直方向速度。當 xVelocity > 0 ,物體會向右移動,反之則向左移動。當 yVelocity < 0 ,物體會向上移動,反之則會向下移動。若 xVelocity 與 yVelocity 皆為 0。舉例來說 object:setLinearVelocity(300, 300) 即是使物體每秒向下、向右移動 300 個像素。
追蹤 (Seeking)
我們可以利用 setLinearVelocity 來實作追蹤的功能。為了實作追蹤功能,我們需要三個數值:追蹤者目前的速度:velocity、追向目標的理想速度: desired velocity、以及轉向力: steering。
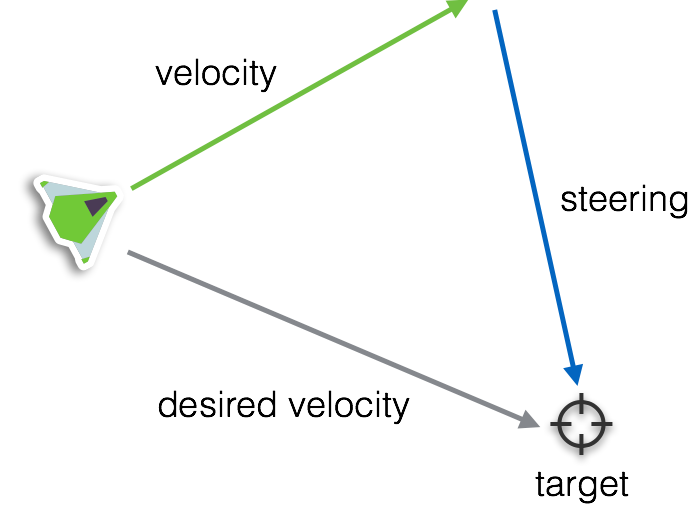
desired velocity 是朝向目標 (Target)的速度,他的方向透過將目標與物體相減取得,大小則是根據追蹤的效果而定,越大的 desired velocity 會讓物體更快速的追蹤到物體。
有了 desired velocity,我們就可以取得轉向力:steering。轉向力會在遊戲每禎施加在追蹤者上,讓它漸漸的朝目標移動,進而達到追蹤的效果。steering 除了影響 desired velocity,也影響 轉向 的速度,steering 越大,追蹤者會越快轉向目標。
順帶一提,move 函式庫已經提供了追蹤物體的方法,你不用特別花力氣去實作追蹤的功能, 這裏我們會示範它的使用方式:
--levels/myLevel/level_seek_1.lua

local gameConfig = require("gameConfig")
local Sublevel = require("Sublevel")
local EnemyPlane = require("enemies.EnemyPlane")
local util = require("util")
local move = require("move")
local myLevel = Sublevel.new("9999999-017", "level name", "author name")

function myLevel:show(options)
    local enemy = EnemyPlane.new()
    self:insert(enemy)
    --place the enemy out of the screen
    enemy.x = gameConfig.contentWidth/4
    enemy.y = -100
    --move the enemy from the top to bottom with speed 100 pixels/second

    --destroy the enemy properly
    enemy:autoDestroyWhenInTheScreen()
    enemy:setScaleLinearVelocity( 0, 300 )
    move.seek(enemy, self.player, {
        maxForce = 50
    })

    self.enemy = enemy
end

function myLevel:isFinish()
    if util.isExists(self.enemy) then
        return false
    else
        return true
    end
end

return myLevel
以上的例子裡,我們先設置敵人的速度,然後我們使用 move.seek 方法去追蹤對象。move.seek 的第一個參數是追蹤者,第二個參數則是目標,第三個參數則是可以調整 seek 行為的選項。maxForce 代表轉向力的大小,當轉向力越大,追蹤者會越快轉向目標,反之越慢。
重力場 (Gravity Field)
當你放置重力場到場上,啟用物理運算的物體可能被它吸引,你可以藉由放置重力場改變物體軌跡。以下的範例中放置了一個重力場 (第 10 行)。 並且將敵人免疫重力場的屬性設定為 false (第 15 行)。如果沒有將遊戲物件中的 immuneGravityField 設定為 false,該物件是不會被重力場影響的。當然你也可以放置多個重力場,觀察物體的移動變化。如果你想看到重力場的大小,可以將 gameConfig.debugPhysics 設為 True。
--levels/myLevel/level_custom_gravity_hole.lua
local gameConfig = require("gameConfig")
local Sublevel = require("Sublevel")
local GravityField = require("GravityField")
local EnemyPlane = require("enemies.EnemyPlane")
local util = require("util")
local myLevel = Sublevel.new("9999999-013", "level name", "author name")

function myLevel:show(options)
    local enemy = EnemyPlane.new()
    local field = GravityField.new({radius = 160 * gameConfig.scaleFactor})

    enemy.x = gameConfig.contentCenterX/2 * 3
    enemy.y = 0

    enemy.immuneGravityField = false

    enemy:setScaleLinearVelocity( -250, 250 )
    enemy:rotateByVelocity()
    enemy:autoDestroyWhenInTheScreen()

    field.x = gameConfig.contentCenterX
    field.y = gameConfig.contentCenterY

    self:insert(field)
    self:insert(enemy)
    self.enemy = enemy
    self.field = field
end

function myLevel:isFinish()
    --print("isFinish!??")
    if util.isExists(self.enemy) then
        return false
    else
        return true
    end
end

function myLevel:finish()
    self.field:clear()
end

return myLevel
非物理移動 (Non-physical move)
非物理的移動方式依賴 Corona SDK 提供的 transition.to 方法或是開發者自己在每禎將物件移動到對應的位置。非物理的移動不需仰賴被移動對象啟用物理運算,只要是顯示物件都可以使用非物理的移動方式。
transition.to
--levels/myLevel/level_transition_1.lua

local gameConfig = require("gameConfig")
local Sublevel = require("Sublevel")
local EnemyPlane = require("enemies.EnemyPlane")
local myLevel = Sublevel.new("9999999-018", "level name", "author name", {duration = 4000})

function myLevel:show(options)
    local enemy = EnemyPlane.new()
    self:insert(enemy)
    --place the enemy out of the screen
    enemy.x = 0
    enemy.y = gameConfig.contentHeight
    transition.to(enemy, {x = gameConfig.contentWidth + 100, y = -100, time = 3000})
    --destroy the enemy properly
    enemy:autoDestroyWhenInTheScreen()
end

return myLevel
我們可以在參數內添加 onComplete,定義 transition 結束時的行為,它會在 transition 結束時被呼叫。透過這樣的技巧,我們可以將多段的 transition 串連起來,達到多段的線性移動。以下的例子即是透過這樣的技巧,讓物體先往右上角移動,當物體達到右上角的位置時,再往左下角移動,最後移出螢幕外被回收。
--levels/myLevel/level_transition_2.lua

local gameConfig = require("gameConfig")
local Sublevel = require("Sublevel")
local EnemyPlane = require("enemies.EnemyPlane")
local myLevel = Sublevel.new("9999999-019", "level name", "author name", {duration = 3000})

function myLevel:show(options)
    local enemy = EnemyPlane.new()
    self:insert(enemy)
    --place the enemy out of the screen
    enemy.x = 0
    enemy.y = gameConfig.contentHeight
    transition.to(enemy, {x = gameConfig.contentWidth, y = 0, time = 1500, onComplete =
        function()
            transition.to(enemy, {x = -enemy.width, y = gameConfig.contentHeight, time = 1500})
        end
    })
    --destroy the enemy properly
    enemy:autoDestroyWhenInTheScreen()
end

return myLevel
指定路徑 (Path)
如果你希望物件以不規則的方式移動,你必須提供路徑。所謂的路徑,是指一連串的點,當你提供越多的點,移動上會精確,但也會消耗越多效能,所以在效能與流暢度之間取得平衡是很重要的。這裏示範如何使用 move.followN 讓物體在提供的路徑上移動。
move.followN 顧名思義是讓物體隨著 N 個點移動,第一個參數是帶入被移動的物體,第二個參數則是路徑,第三個則是作為改變移動行為的選項。首先我們先指定物體的起始位置 (0, 0) (第 12,13 行)。接著指定路徑:(gameConfig.contentWidth, gameConfig.contentHeight/2) 與 (enemy.width, gameConfig.contentHeight) (第 15 ~ 18 行)。最後在第 21 行調用 move.followN移動物體。如此一來物體變會從螢幕左上角,移動到螢幕右側中央,在移動到螢幕左下角。
這個例子指定了第三個參數調整移動的行為,透過指定 speed 決定物體移動的速度,單位為 像素/秒。並指定 autoRotation 讓物體隨著移動方向自動轉向。回收物件的部分也做了小變化,透過指定 onComplete,讓物體移動到最後一個點時回收自己。
--levels/myLevel/level_path.lua

local gameConfig = require("gameConfig")
local Sublevel = require("Sublevel")
local EnemyPlane = require("enemies.EnemyPlane")
local myLevel = Sublevel.new("9999999-020", "level name", "author name", {duration = 3000})
local move = require("move")

function myLevel:show(options)
    local enemy = EnemyPlane.new()
    self:insert(enemy)
    --place the enemy out of the screen

    enemy.x = 0
    enemy.y = 0

    local pathPoints = {
        {x = gameConfig.contentWidth, y = gameConfig.contentHeight/2},
        {x = -enemy.width, y = gameConfig.contentHeight}
    }

    --destroy the enemy properly
    move.followN(enemy, pathPoints, {
        speed = 400*gameConfig.scaleFactor,
        autoRotation = true,
        onComplete = function()
            enemy:clear()
        end
    })
end

return myLevel
曲線移動 (Curved Move)
要怎樣讓物體進行曲線移動呢?我們當然可以用物理的方式達成,例如放置重力井,但這樣的做法會很難讓我們預估實際上產生的軌跡。
另一個做法是:其實我們可以先產生曲線路徑,再讓物體沿著路徑上的點移動。那麼要如何產生曲線呢?你可以透過人工的方式一個一個點指定,或是採用本模板提供的曲線產生方法:move.getCurve。
move.getCurve有兩個參數,第一個參數為參考點,第二個則為採樣點數。特過這兩個參數,我們可以產生貝茲曲線 (bezier curve)。貝茲曲線在遊戲內被運用的相當廣泛,他可以作為路徑,也可以作為動畫參考數值,舉例來說,消失的動畫效果可以是線性的消失,透過在每禎降低固定的 alpha 數值達成。但如果我們希望它會隨著時間的增加,而消失的更快,就可以使用貝茲曲線定義每禎應該調降的 alpha 幅度,達到非線性的動畫效果。(http://www.css3beziercurve.net)
在本模板中,我們只將貝茲曲線用來描繪路徑。如下圖,貝茲曲線是由 4 個參考點產生的,你可以透過運行 CurveDrawing (https://gitlab.com/keviner2004/CurveDrawing) 專案取得這四個參考點,並套用在 move.getCurve 上。
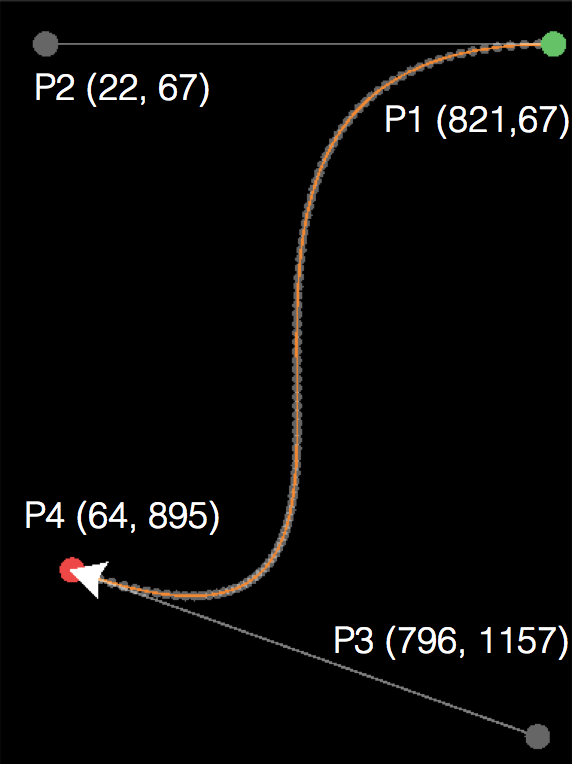
我們直接看一下實際的例子,在以下的程式碼中,我們先在 11~18 行產生曲線路徑,取樣的點數為 100,這代表我們會用 100 個點描繪曲線,這在大部分的情況已經很夠用了。並在 20~21 行將物體的起始點設定為路線的起點,最後將路徑帶入 move.followN (第 24 行),物體便會沿著路徑上的每個點進行“直線移動”,只有取樣的點夠多,就會看起來像是曲線移動了。也一如先前所提的,太多的取樣點會造成效能負擔,這部分就待開發者自行取捨了。
--levels/myLevel/level_curve.lua

local gameConfig = require("gameConfig")
local Sublevel = require("Sublevel")
local EnemyPlane = require("enemies.EnemyPlane")
local myLevel = Sublevel.new("9999999-021", "level name", "author name", {duration = 3000})
local move = require("move")

function myLevel:show(options)
    local enemy = EnemyPlane.new()
    self:insert(enemy)
    --place the enemy out of the screen

    local pathPoints = move.getCurve(
        {
            {x = gameConfig.contentWidth, y = 67}, --P1
            {x = gameConfig.contentWidth*0.1, y = gameConfig.contentWidth*0.1}, --P2
            {x = gameConfig.contentWidth, y = gameConfig.contentHeight}, --P3
            {x = -gameConfig.contentWidth*0.1, y = gameConfig.contentHeight*0.8} --P4
        }, 100)

    enemy.x = pathPoints[1].x
    enemy.y = pathPoints[1].y

    --destroy the enemy properly
    move.followN(enemy, pathPoints, {
        speed = 300 * gameConfig.scaleFactor,
        autoRotation = true,
        onComplete = function()
            enemy:clear()
        end
    })
end

return myLevel
繞物移動 (Rotated Move)
有時候我們只是很單純的希望一個物體環繞另一個物體,最簡單的方式就是使用如下圖的三角函數,在每禎隨著被繞物體的移動而更新位置。

move.rotateAround 就是提供這樣的功能。這裏我們便用 move.rotateAround 來實作繞物移動:讓隕石會圍繞著飛機不斷旋轉。move.rotateAround一共接受兩個參數,第一個為要圍繞的物體,第二個則是圍繞的行爲設定。圍繞的選項中,最重要的是 target,他是被圍繞的對象,在以下的例子中即為敵人,接著我們用 speed 調整速度,speed 為每禎要圍繞的角度差。而 distance 則是圍繞的半徑、startDegree 則為物體在圓上的起始的角度。值得注意的是我們也設置了 onMissTarget,這個方法會在被圍繞的目標消失的時候被呼叫。當被圍繞的目標消失,我們透過三角函數,讓隕石隨著切線移動,也由於設定了 autoDestroyWhenInTheScreen 的關係,當隕石離開螢幕便會消失 。
--levels/myLevel/level_rotate_around.lua

local gameConfig = require("gameConfig")
local Sublevel = require("Sublevel")
local Rock = require("asteroids.BrownBig1")
local EnemyPlane = require("enemies.EnemyPlane")
local myLevel = Sublevel.new("9999999-022", "level name", "author name", {duration = 3000})
local move = require("move")

function myLevel:show(options)
    local enemy = EnemyPlane.new()
    local rock = Rock.new()
    rock.hp = 120
    self:insert(enemy)
    self:insert(rock)
    --place the enemy out of the screen

    enemy.x = gameConfig.contentWidth * 0.6
    enemy.y = 0
    enemy:setScaleLinearVelocity( 0, 150 )

    rock:autoDestroyWhenInTheScreen()

    self:addTimer(4000,
        function()
            enemy:clear()
        end
    )

    move.rotateAround(rock, {
        target = enemy,
        speed = 5,
        distance = 75 * gameConfig.scaleFactor,
        startDegree = 30,
        onMissTarget = function(angle)
            local d =  angle + 90
            rock:setScaleLinearVelocity( 150 * math.cos(math.rad(d)) , -150 * math.sin(math.rad(d)) )
            print(angle, d)
        end
    })

end

return myLevel
旋轉、座標系與三角函數
這裡必須提醒開發者:三角函數所用的座標系與 Corona 的座標系是不同的。也因此在旋轉物件時必須特別小心。三角函數座標系中,y 軸往上其值越大,Corona 座標系則相反。三角函數座標系中,角度的計算是逆時針遞增,0 度指向 x 軸右側,越往逆時走角度越大。但 Corona 顯示物件的旋轉座標系剛好相反,0 度指向 x 軸右側,角度則隨著順時針增加。

換言之當你你寫了以下的程式碼,object 會以它的原點為中心順時針旋轉 90 度。
object.rotation = 90
當角色需要往某個角度 d 移動時,也因為三角函數式座標系與Corona 座標系 y 軸顛倒,需要在 y 方向加上負號:

object:setLinearVelocity( 300 * math.cos(math.rad(d)) , -300 * math.sin(math.rad(d)) )
注意,math 中的三角函數方法是以弧度作為單位,而不是角度,所以我們要先透過 math.rad 將角度轉為弧度。
每禎移動 (Enter frame move)
我們示範如何在每禎自己定義物件的移動位置。本模板的遊戲物件支援一種比 Corona 原生的每禎處理機制還要便利的工具。你只需要使用 GameObject.enterFrame:each 就可以在每禎處理該物件的任務。與原生機制不同的地方在於,當該物件被移除,添加的禎處理事件也會自動被移除。不需再透過 Runtime:removeEventListener 手動移除註冊的禎監聽事件。
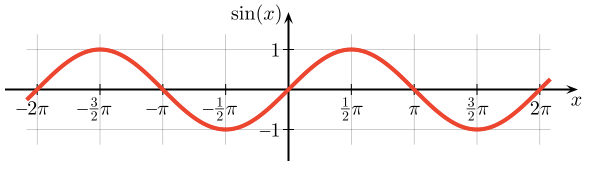
我們利用 sin 函數的值會在 0 ~ 1 震盪的特性,來讓物件左右不斷移動。在第 17~20 行中,我們在每禎將 deg 變數增加,再透過 math.sin 對它進行運算指派給 ratio 變數,這樣一來我們每禎都可以得到一個 0 ~ 1 的數值,如下圖。當 ration 大於 0 時物件會向右移動,而 ratio 小於 0 則會向左移動。而震盪的幅度取決於 offset的大小,我們指定他為 0.35 倍的螢幕寬,使物體不會超出螢幕。
--levels/myLevel/level_sinwav.lua

local gameConfig = require("gameConfig")
local Sublevel = require("Sublevel")
local EnemyPlane = require("enemies.EnemyPlane")
local myLevel = Sublevel.new("9999999-023", "level name", "author name")
local util = require("util")
function myLevel:show(options)
    local enemy = EnemyPlane.new()
    self:insert(enemy)
    --place the enemy out of the screen
    local defaultX = gameConfig.contentWidth/2
    enemy.x = defaultX
    enemy.y = -enemy.height/2
    local deg = 0
    local offset = gameConfig.contentWidth * 0.35
    enemy.enterFrame:each(
        function()
            if enemy.paused then
              return
            end
            local ratio = math.sin(math.rad(deg))
            deg = deg + 2
            enemy.x = defaultX + ratio * offset
            enemy.y  = enemy.y + 3
        end
    )

    --destroy the enemy properly
    enemy:autoDestroyWhenInTheScreen()
    self.enemy = enemy
end

function myLevel:isFinish()
    if util.isExists(self.enemy) then
        return false
    else
        return true
    end
end

return myLevel